Colin Brown has brought many examples of segmented bowls, vases and bud vases.
He has kindly provided details of the process used to complete these pieces. Details include the initial preparation of the Requirements, the calculations involved together with prepared tables, and finally the layout of the jig to assemble the piece.
The first step is to create an accurate scaled sketch of the shape you want to create.
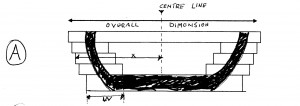
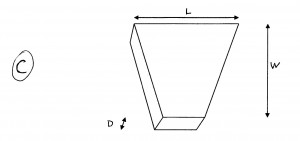
This shows how each ring of pieces has a different radius – radius X. It also shows the width W of each Segment piece. This is the same for each ring – after the glue has dried these are the parts which get shaped on the lathe. Sketch C shows the dimensions of each segment.
Dimension D is the thickness of each segment or ring.
W is the width of the segment
L is the segment length .
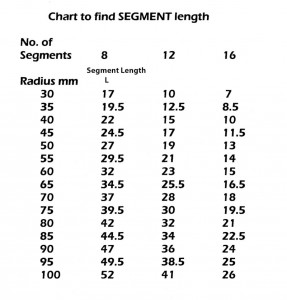
The length L of each segment of a ring is given in this table – note the table shows options for 8, 12 and 16 segments per circle – here the jigs which follow are for the 8 segment circle.
From the table select the radius for the ring you are building and note the Segment Length L
Prepare the wood you are going to use – its thickness D and Depth D.
Set a bevel gauge to an angle of 75 degrees (90-15) and mark the segments out on the wood.
Cut out the segments – on a bandsaw/jig saw and prepare the surfaces.
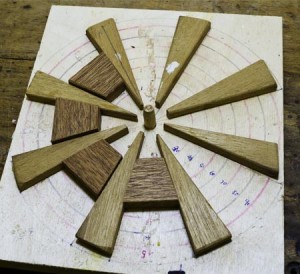
The segments will be assembled and glued together using a jig, using an overlap of segments from layer to layer as shown:-
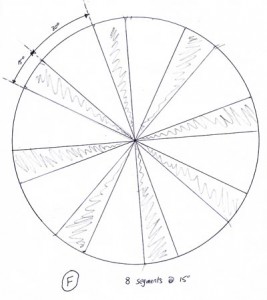
The jig is drawn out as below:-
This the jig for an eight segment circle.
The “locating wedge” has an angle of 15 degrees.
The gap for the prepared segment has an angle of 30 degrees.
Note the extra radius circles drawn on the base. They assist with the construction of the jig and also give confidence that the segments cut will give the required dimensions for the finished piece.
The first ring of segments will be glued onto the base of the piece being made.
When the glue has dried remove the rings from the sheet, and lightly sand on a lathe disk to ensure that all segments are level.
Put in the segments for the next layer into the jig, apply adhesive, and put the previous layer on top – making sure the spacing is correct as shown in Sketch E below. Use the reference line marked on the jig to assist.
Repeat this process until all of the segment rings have been completed.

